| タップ | 指で、タッチスクリーンを、指先で軽く叩くこと。 | ■アプリを起動する際、画面を切り替える際。 |
| ダブルタップ | タッチスクリーンを、指先で2回連続、叩くこと。 | ■スマホ画面の縮小・拡大。 |
| ロングタップ | 指先でタッチスクリーンを、しばらく指を離さずに、抑えたままでいること。 | ■ホーム画面のアイコンを、動かせる状態にする。 ■使用しているアプリの機能メニューを呼び起こす。 |
| フリック | タッチスクリーンに触れて、素早く指先を、上下左右の方向に払う(スライドさせる)こと。 | ■フリック入力。 ■画面を次のページに移動させたり、コ、画面を早く上下左右に、読みたい箇所まで、スクロールさせたりすることが可能。 |
| ピンチ | 2本の指で、タッチスクリーンを、つまむように操作すること。 | ■画像や地図、文章、webページを、見やすいサイズに、縮小・拡大する。 |
| ドラッグ | タッチスクリーンに指を触れたまま、意図する方向にスライドさせて行き、任意の位置で離すこと。 | ■アイコンやボタンを、移動させる。 |
| マルチタップ/マルチタッチ | 2本以上の指で、入力操作を行うこと。 | ■楽器アプリ。 ■Google Map。 |
| タッチアンドホール | タッチスクリーンに指をあてて、タップしたままの状態にすること。 | ■ホールドしたアイコンやWidgetの移動。 ■ホーム画面を編集モードに切り替え。 |
念願のロードスター(NC3)RS-RHT購入しました。 オープンの開放感たまりません!! 電動で簡単に開閉できるシステムは秀逸です。 最後のNCとなるであろうこのモデルを選びました。 最近VW ゴルフRが仲間入りしました。
2020年5月26日火曜日
スマホの指使い(ピンチ)
スマホの指使い
2020年5月23日土曜日
IX2215初期設定④まとめ
ここでIX2215で最初にやることをまとめてみました。
初期化後の状態では、
(1)adminユーザが未登録
(2)IPアドレスやDHPCが設定されていない
(3)Web設定画面がでない
です。
そこで下記を実施します。
①admin-user 追加と パスワード設定
Router# configure
Enter configuration commands, one per line. End with CNTL/Z.
Router(config)# username admin-user password plain 1 *e***3** administrator
% User 'admin' has been added.
※設定のセーブ
Router(config)# write memory
Building configuration...
% Warning: do NOT enter CNTL/Z while saving to avoid config corruption.
Router(config)# exit
Router#
②ipアドレスの設定
Router# configure
--------------------------------------------------
!
logging buffered
logging subsystem all warn
logging timestamp datetime
!
ip ufs-cache enable
ip dhcp enable
ip access-list web-http-scl permit ip src any dest 192.168.1.254/32
!
######http-server ip access-list web-http-acl <==要注意① 結果的に省略
http-server ip enable
http-server username admin-user
!
######web-console interface lan1 GigaEthernet2.0 <===要注意② 結果的に省略
!
ip dhcp profile dhcp-profile <Enter>でip設定モードへ
dns-server 192.168.1.254
<exit> ip設定モード解除
!
interface GigaEthernet2.0 <emter>でinterface設定モードへ
ip address 192.168.1.254/24
ip dhcp binding dhcp-profile
no shutdown
※設定のセーブ
Router(config)# write memory
Building configuration...
% Warning: do NOT enter CNTL/Z while saving to avoid config corruption.
Router(config)# exit
2020年5月17日日曜日
2020年5月16日土曜日
IX2215初期設定③
IX2215便利なコマンド
※コンフィグモードへ変更
>Router# configure
または、
>Router# enable-config
※設定の表示(確認)
>Router# show running-config
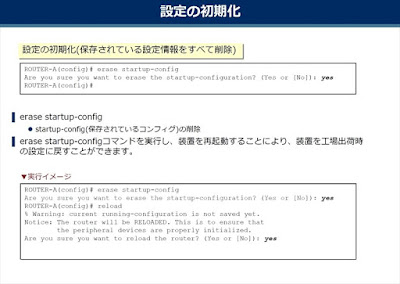
※初期化
>erase startup-config
>Are you sure you want to erase the startup-configuration? (Yes or [No]): yes
>ROUTER-A(config)#
erase startup-configコマンドを実行し、装置を再起動することにより、装置を工場出荷時の設定に戻すことができます。

※設定のセーブ
>Router(config)# write memory
出力結果
Building configuration...
% Warning: do NOT enter CNTL/Z while saving to avoid config corruption
※入力済みコマンドの削除
>no 「入力済みコマンド全部」
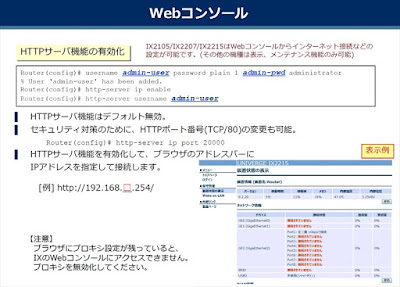
※Web設定画面から入力を有効に
>Router(config)# username admin-user password plain 1 admin-pwd administrator
> % User ‘admin-user' has been added.
>Router(config)# http-server ip enable
>Router(config)# http-server username admin-user

※コンフィグモードへ変更
>Router# configure
または、
>Router# enable-config
※設定の表示(確認)
>Router# show running-config
※初期化
>erase startup-config
>Are you sure you want to erase the startup-configuration? (Yes or [No]): yes
>ROUTER-A(config)#
erase startup-configコマンドを実行し、装置を再起動することにより、装置を工場出荷時の設定に戻すことができます。

※設定のセーブ
>Router(config)# write memory
出力結果
Building configuration...
% Warning: do NOT enter CNTL/Z while saving to avoid config corruption
※入力済みコマンドの削除
>no 「入力済みコマンド全部」
※Web設定画面から入力を有効に
>Router(config)# username admin-user password plain 1 admin-pwd administrator
> % User ‘admin-user' has been added.
>Router(config)# http-server ip enable
>Router(config)# http-server username admin-user

IX2215初期設定②
IX2215をLANケーブルでPCとつないでもデフォルトでWeb設定できません。
※最新のファームで出荷されているものはデフォルトでWeb設定有効になっています。
設定を初期化すると、DHCPすらオンになっていないので、こちらも問題です。
ターミナルモードで接続して、コマンド入力でIPアドレス設定やWeb設定可能など最低限の設定を変更します。
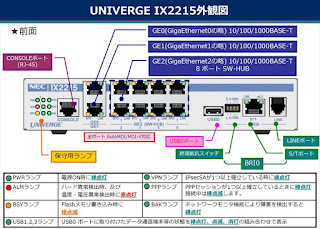
IX2215の正面ポート、LED

LANポート GE0 GE1 GE2
初期設定のためにコンソールをつなぐ
最近のパソコンは、RS232Cコネクターは存在しません下記で代用します。
Windows10用USB-->RS232C 変換ケーブル
下記はエレコムのUSB、RS232c変換ケーブルですが、対応がWindows7まで
USB、RS232Cケーブルの先に、IXシリーズ専用のコンソルケーブルをつなぐ
USB、RS232Cケーブルは、COM3として認識されてました。
TeraTermを使ってシリアル接続(コンソール接続)
こんな感じでIX2215とつながりました。
IX2215初期設定①
最近入手した、IX2215ですが、初期化されておりバージョンか下記でした。
初期状態:Version 8.9.17B
NEC Portable Internetwork Core Operating System Software
Copyright Notices:
Copyright (c) NEC Corporation 2001-2013. All rights reserved.
Copyright (c) 1985-1998 OpenROUTE Networks, Inc.
Copyright (c) 1984-1987, 1989 J. Noel Chiappa.
Router#
Router#
Router# show running-config
% running-config -- Invalid command.
Router# configure
Enter configuration commands, one per line. End with CNTL/Z.
Router(config)# show running-config
Current configuration : 1307 bytes
! NEC Portable Internetwork Core Operating System Software
! IX Series IX2215 (magellan-sec) Software, Version 8.9.17B, MAINTENANCE RELEASE SOFTWARE
! Compiled May 17-Fri-2013 16:03:05 JST #2
! Current time May 16-Sat-2020 09:23:16 JST
!
IX2215はLANポートが3個あります。
それぞれ、GE0(1個) GE1(1個) GE2(8個) 普通は、GE0はWAN(PPPoE)、GE3がローカルLAN
IX2215のこのファームバージョンでは初期化するとWeb設定ができなくなります。
コンソール(ターミナルモード)からコマンドラインで入力する。
==> ターミナル入力について
※local IPアドレス設定
NECのマニュアルによるとまず初めに下記を入力するように説明がある
--------------------------------------------------
!
logging buffered
logging subsystem all warn
logging timestamp datetime
!
ip ufs-cache enable
ip dhcp enable
ip access-list web-http-scl permit ip src any dest 192.168.1.254/32
!
http-server ip access-list web-http-acl <==要注意① 結果的に省略
http-server ip enable
!
web-console interface lan1 GigaEthernet2.0 <===要注意② 結果的に省略
!
ip dhcp profile dhcp-profile <Enter>でip設定モードへ
dns-server 192.168.1.254
<exit> ip設定モード解除
!
interface GigaEthernet2.0 <emter>でinterface設定モードへ
ip address 192.168.1.254/24
ip dhcp binding dhcp-profile
no shutdown
<exit> interface設定モード解除
--------------------------------------------------
要注意①の行のコマンドを入力すると制限が掛かってWEB設定にアクセスできなくなる。
ここでは、とりあえず省略する。
入力してしまった場合は、
> no http-server ip access-list web-http-acl
で削除しておきます。
このファームバージョンは、
要注意②はコマンド入力時にエラーになってします。
% web-console -- Invalid command. <==このエラーでした。
とりあえず省略でOK
※web有効化するにはさらに下記とadminユーザの追加とパスワードが必要です。
Router(config)# http-server ip enable
Router(config)# http-server username admin-user
※admin 追加と パスワード設定
Router# configure
Enter configuration commands, one per line. End with CNTL/Z.
Router(config)# username admin-user password plain 1 **d***3* administrator
% User 'admin' has been added.
※設定のセーブ
Router(config)# write memory
Building configuration...
% Warning: do NOT enter CNTL/Z while saving to avoid config corruption.
Router(config)# exit
Router#
電源リセットで再起動すると、Web設定が可能になります。
次は、このWEB設定画面から最新のファームウエアへバージョンアップします。
以上で初期設定はおしまいです。
ここまでできればあとは、WEB設定画面から、必要な設定が簡単にできます。
2020年5月2日土曜日
登録:
コメント (Atom)


